Wall formwork
Instructions for assembly and use (Method statement)
DokaXlight as a hand-set formwork
The sequence shown here is based on a straight wall. However, you should always start to form from the corner outwards.
.
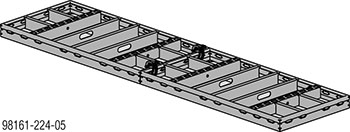
Transporting / handling the panels
➤ Unload panel stacks and multi-trip boxes and pallets from the truck (see the section headed 'Transporting, stacking and storing').

.
Closing the formwork
➤ Pre-assemble gang-forms 'flat on their backs' on an assembly bench (see 'Inter-panel connections').
➤ Spray the formwork sheet with release agent (see the section headed 'Cleaning and care of your equipment').
|
|
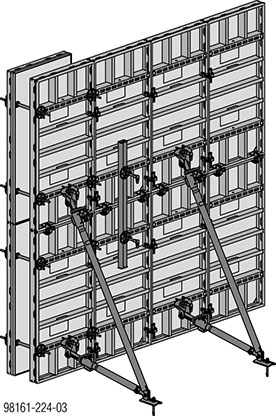
WARNING ➤ DokaXlight panels must be securely braced in every phase of the construction work! |

➤ Fix panels to the ground with plumbing struts or panel struts (see the section headed 'Plumbing accessories').
This stabilises the panels so that they cannot fall over.
|
|
NOTICE Never use a sledge-hammer to plumb and align the panels! This would damage the profiles of the gangs. ➤ Use only proper plumbing tools (e.g. a special pry-bar) that cannot cause any damage. |

➤ Continue lining up panels in this way, clamp them together (see the section headed 'Inter-panel connections') and fix them to the ground with plumbing struts or panel struts.
The panel assembly can now be exactly plumbed and aligned.

.
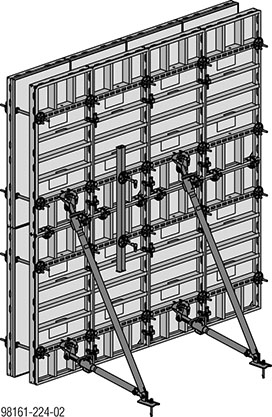
Erecting the opposing formwork:
Once the reinforcement has been placed, the formwork can be closed.
➤ Spray the formwork sheet of the opposing formwork with release agent.
➤ Set up the first panel of the opposing formwork.
➤ Fit the form ties (see the section headed 'Tie rod system').
Now the opposing formwork is also secured against tipping over.
➤ In the same way, carry on lining up panels, clamping them together and fitting form ties.
.
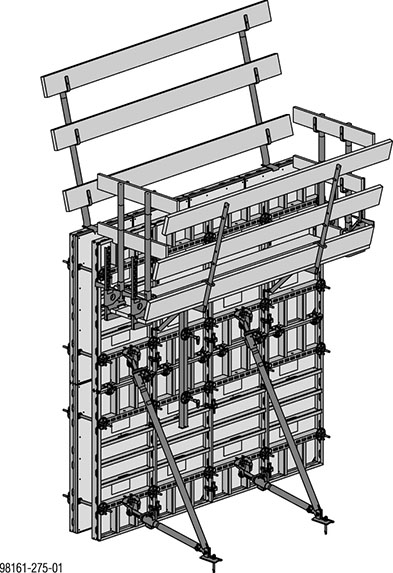
Mounting the pouring platform
➤ Install the pouring platforms and erect end-of-platform sideguards (see the section headed 'Pouring platforms with single brackets').
|
|
NOTICE Multi-panel gangs without an opposing formwork and with pouring platforms and Plumbing struts 260 must be fixed on the ground so that they cannot be dislodged. |
.
Ladder systems and working scaffolds
Platform stairway 0.97m
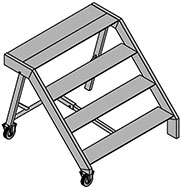
▪ wheel-around, fold-down platform stairway made of light alloy
▪ working heights of up to 3.00 m
(max. standing height 0.97 m)
▪ Stair width: 1.20 m
|
Max. load-bearing capacity: 150 kg |
|
|
Follow all country-specific regulations! |

.
Wheel-around scaffold DF
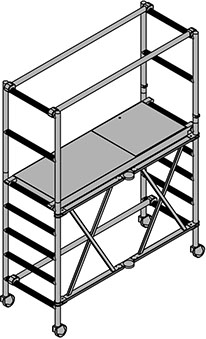
▪ Collapsible wheelaround platform made of light alloy.
▪ variable working heights of up to 3.50 m
(max. platform height 1.50 m)
▪ width of scaffold: 0.75 m
|
|
Follow the directions in the User Information booklet! |
.
Working scaffold Modul
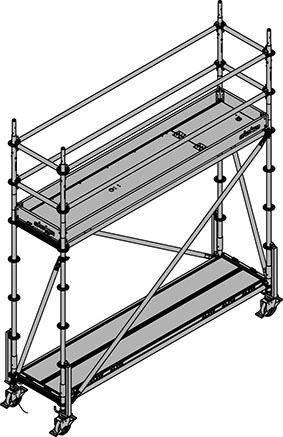
▪ Movable working scaffold
▪ variable working heights of up to 3.50 m
▪ width of scaffold: 0.73 m
▪ length of scaffold: 2.07 m
Ballast weight required
|
Standing height |
Ballast weight |
|---|---|
|
1.41 m |
40 kg |
|
1.91 m |
100 kg |
|
|
Follow the directions in the User Information booklet! |
.
Pouring
|
Permitted pressure of the fresh concrete: See the section headed 'Permissible fresh-concrete pressure'. |
Observe the following guidelines:
▪ The section headed 'Pressure of fresh concrete on vertical formwork – DIN 18218' in the Calculation Guide 'Doka formwork engineering'
▪ DIN 4235 Part 2 - 'Compacting of concrete by vibrating'
|
|
NOTICE ➤ Do not exceed the maximum permissible rate of placing. |
➤ Pour the concrete.
➤ Make only moderate use of vibrators, carefully co-ordinating the times and locations of vibrator use.
.
Stripping the formwork
|
|
NOTICE ➤ Comply with the stipulated stripping times. |
➤ Beginning with the opposing formwork, dismount the panels one by one - take out the pouring platform, remove the ties and remove the connectors to the neighbouring panel.
➤ Lift the panel away and clean concrete residue off the formwork sheet (see the section headed 'Cleaning and care of your equipment').
.